Pages

Monday, September 30, 2013

Organized Linen Closet & First Aid


Our linen/bathroom closet is a narrow closet in our hallway.  There isn't a closet in our bathroom, so everything has to be put in here.  The only actual linens in here are our bath towels and wash cloths.  We only have one change of sheets per bed and they are kept in the bedrooms. In this closet, we keep any bathroom essentials that aren't currently being kept in the shower or the vanity drawers.  This is usually stuff like extra shampoo, soap, shaving cream, deodorant, etc.  Other items we keep in here are sunscreens, travel and sample size products, extra cotton balls and q-tips, nail polish and makeup bags.  We also keep the first aid supplies in this closet.  Here is a full view of the linen closet.


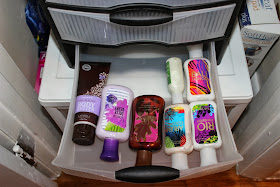
And some closer views


I keep my nail polish essentials in a small plastic drawer container that I picked up from Target.  I also keep this green folding stool in this closet so that I can reach the top shelf when I need to, or to easily grab when I need to reach something high in any room at this end of the house.


We also keep all of the first aid items in this closet with the exception of medications.  We keep medicine in a kitchen cabinet.  To organize these items I used a plastic divider bin and a fabric bin from the Itso line at Target.  I am not sure if the divider piece is intended to set on the fabric bins, but it worked out for this purpose.


And that is about it for the linen closet.  It's small, but it works.  The size kind of keeps us from overbuying when it comes to toiletries.  I love my solution for the first aid items.  Before we had band-aids and ointments floating all over this closet.  It was a mess.  Now we can see exactly where everything is and it's in a spot that's easy for adults to reach, but high enough that the kids can't get to it easily.  Do you keep your first aid in your linen closet?  Is your linen closet strictly for linens?


I am attending these link parties with this post:
A Bowl Full of Lemons
Not Just A Housewife
I Heart Organizing

Friday, September 27, 2013

Hello And Welcome To My Blog!

Happy Friday everyone!  Now that I have a few posts under my belt, I decided to elaborate on my "About Me" and give you a better sense of who I am and why I made this blog!  Enjoy your weekend!

For a few years, I have been faithfully following a number of home organizing/cleaning/DIY/decorating/budgeting blogs and I am discovering new ones everyday.  There are so many women out there who have inspired me to make my house a home, mainly by way of organizing.  Many of them host link parties or organizing challenges and I have always wanted to participate.  And so this little blog was born.  I plan for this to be a place where I can share my adventures in all of the categories previously mentioned.  I am probably the messiest person that I know who claims to be addicted to organizing.  But I am trying and I truly enjoy getting our family more organized, even if it is extremely little by little.  In my head is a vision of a cozy home where there is a place for everything and everything is in its place.  I would assume that this is true for most people.  I just feel like blogging about it!

That being said, my husband and I have 4 children under the age of 7.  I will never expect for our house to be perfect.  That would just be crazy talk.  Our house is on the smaller side for a family of 6, and someday we hope to be able to purchase something bigger, but we love it for now.  The older gentleman who sold us our 1960's ranch home said he chose us over another buyer because he wanted "to see some life back in this house."  And boy, have we delivered! 

Thank you so much for stopping by to check out what I am up to.  I hope you find Organizing for Six to be inspiring, relatable and fun!  Please enter your e-mail address in the subscribe bar if you like what you see and wish to be notified whenever I publish a new post.  I will be so appreciative!  Thanks again and enjoy!


Wednesday, September 25, 2013

Fall To Do List & Dining Room Tour


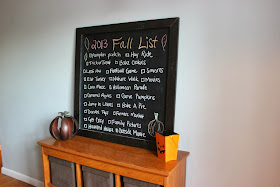
At the beginning of Summer, I came across a picture in HGTV magazine of a seasonal chalkboard to do list.  I just had to have one.  It was easy enough to make with a few essentials from Lowes.  I picked up a cheap piece of paneling, which I had cut to the size I wanted.  Mine is a 3’ x 3’ square.  I also picked up enough molding to make a “frame” around the piece of paneling.  With a small can of chalkboard paint, oil-rubbed bronze spray paint for the frame, and a few paintbrushes, I was set.  I painted 2 coats of the chalkboard paint onto the smooth size of the paneling.  My husband cut the molding with his miter saw and I spray painted the 4 pieces before he nailed them all together and attached them around the piece of paneling.  And with a little rearranging of my dining room furniture (aka swapping two pieces), I had the perfect spot for our brand new seasonal to do list!  This was our summer list.


We didn’t accomplish everything on our list, but the kids enjoyed filling in the boxes whenever we did one of the activities.  My older daughter and son were happy to name off things that they wanted to put on the fall list.  Yesterday, summer was erased and now we can start fresh with our new list of activities!  


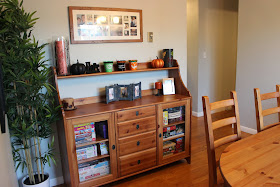
Here are a few more pictures of our dining room.  I just put out a few small fall decorative pieces.  


I got these little Halloween pails and glittery pumpkins from the dollar spot in Target.  


We keep our age appropriate games and puzzles in the buffet cabinets.  It's the perfect place since we play them at the dining room table.  We do more of that in our dining room than actual dining.  We have an eat-in kitchen table which gets more use during mealtimes.  Besides, this table only has 4 chairs and we have 6 people in our family.  If and when we buy our forever home, I hope to have a dining room large enough to accommodate all of us.  Anyway, at some point, I am considering putting decorative paper along the glass to conceal the games, but for now we are forced to keep them pretty neat.  


The vase in the corner of the room is filled with my daughter's handmade bouquet.  So pretty!


Our dining room doesn't look too shabby when the table isn't covered with the coats, bags, toys, papers, etc. that tend to land there throughout the week.  Next up is to organize the drawers in the buffet and the baskets under the To Do list.  I am not really sure what I want to keep in them though as we don't really use the dining room for dining.  What do you keep in your dining room buffet/hutch/etc?  Do your families have your meals there every day?


Linking up to these amazing blogs!


Thursday, September 19, 2013

My Daughter's Room - Clean & Organized

My oldest child, a 6 year old daughter, is the only one of our 4 children who has her own room.  The other 3 are supposed to share a room, but that is another story.  Anyway, her room was a disaster a few weeks ago.  Clothing, toys, books, shoes, paper, beads and gems galore.  All.  Over.  The.  Floor.  If I can remember correctly, her room was exactly like mine when I was 6.  Go figure!  Here are a few before pictures.


Previously, her closet had two sliding doors.  I just took them down before taking that last picture.  If she had the type that "fold" out, I would have left them up, but the sliding type are just horrible.  So I decided to just remove them.  It instantly opened up the space.  Hopefully it will also force us to keep it organized.  When we put everything back into her closet, I added a few things.  We put her Closetmaid cubbies in there, a bin with her stuffed animals, a new hamper and a few plastic bins.  Along the top are a few baskets and bins.  Up there we are keeping her nicer jewelry that is still in their original boxes and packaging and arts and crafts that are still in boxes as well.  The closet is looking much better since then and she has been excellent about putting her dirty clothing in her new hamper.  Yay!


She recently got a small desk, chair and wall cubbies from Ikea, but I could never figure out what to do with the space.  It was driving me nuts.  We hung up an Ikea Bygel rail and added some buckets to keep her crayons and pencils in.  I gave her a magazine file to keep completed artwork in.  I purchased Disney princess printable silhouettes from Etsy and had her favorite, Cinderella, printed out in no time.  It fit perfectly next to the Bygel rail.  She has a million collections, some of which ended up in the wall cubbies above her desk.


I found some adorable labels at Target and used them in combination with my label maker to give each of her wall bins a purpose.  She told me what goes in each of them and I printed out the labels on clear tape and voila!


She also wanted a place to put some of her artwork on the wall.  So I picked up some Martha Stewart corkboards that just stick to the wall.  They work perfectly!


Overall, everything turned out really well.  It's been like this for a few weeks now and while it has gotten messy again, it's been easier to put everything back where it belongs.  There are also a few more things we need to address (that horrible wire hanging down the wall from her ceiling lamp), but those will come with time.  So far, so good!  Here is the Grand Finale!


Linking up to these amazing blogs!

Wednesday, September 18, 2013

Organizing Children's Art Supplies
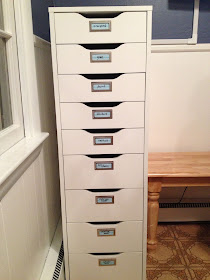
Do your children have an excessive amount of art supplies?  Mine do.  We previously stored everything in a plastic rolling cart with drawers.  I think I bought that at Target.  It was working just fine, but it was a bit flimsy and definitely didn't have enough space to accommodate all of their stuff.  So, during a trip to IKEA back in April, I bought the Alex 9-drawer unit.  At first we just threw everything in there, but I knew eventually I would want to give each drawer a purpose.  Well I just accomplished that a few weeks ago!  The first step was to label the drawers.  I bought silver Martha Stewart bookplates from Staples and put one on each drawer.  Please do not mind our ugly kitchen floor in these pictures.  I have hated it since moving in 2 years ago, but it still has yet to be updated.  


After emptying out all of the drawers, I organized everything into piles and worked out my categories.  I ended up with crayons (markers ended up in here as well), glue, paint, stickers, tattoos, arts and crafts, coloring books (x2), and activity books.


I used washi tape to cover the white slips that came with the bookplates.  I contemplated using my labeler to label them, but I was out of the clear tape and would have preferred that.  So I just hand wrote on the washi tape with a Sharpie.  


Once that was done, all that was left to do was fill up the drawers!  I am super happy with this and hope that it will help the children keep their art supplies organized and in somewhat decent condition!  We are currently keeping this drawer unit in the corner of our eat-in area in the kitchen.  The kids do most of their arts and crafts at that table, so while it's not the most attractive spot, for now it is the most convenient.


Linking up to these amazing blogs!