Sunday, February 15, 2015

Lego Organization


What to do when your son or daughter suddenly has a lot of Legos (thank you, Christmas) and they are ALL OVER THE PLACE?  Well, if you're anything like me, you find an organized solution ASAP.  I checked Google and Pinterest for ideas and decided that the best solution for us would be to organize Legos by color.  While organizing by set is ideal for some, it just wouldn't work for us, as pieces from the different sets were all mixed together almost as soon as the packages were opened.  There was no way to know which piece belonged to which set until they would actually start building something.  It's proved to be much easier to find pieces by color.  

I also wanted to dedicate a space in my son's room for Legos.  Somewhere that he could build and store them would be perfect.  We needed a desk.  Off to Target I went.  I picked up a small desk with two drawers.  Luckily for us, it fit perfectly next to the bunk beds!  I also added an IKEA shelf that was sitting in the basement waiting to be used after it got the boot from my daughters' room.  I brought up a lonely chair from the basement as well and voila, a perfect little spot for Legos!  


The shelf above his desk holds a few things.  I put instruction booklets in three of the bins.  This is working fine until I find a better solution for them, possibly in a binder.  Another bin holds his Angry Birds "Legos."  I am keeping them separate because they are not by the Lego brand and have a slightly different look and size to them.  I also put his Angry Birds and the pigs in here as well.  They are not Legos, but he plays with them often.  I labeled the bins with vinyl, which I cut with my Silhouette Cameo.  


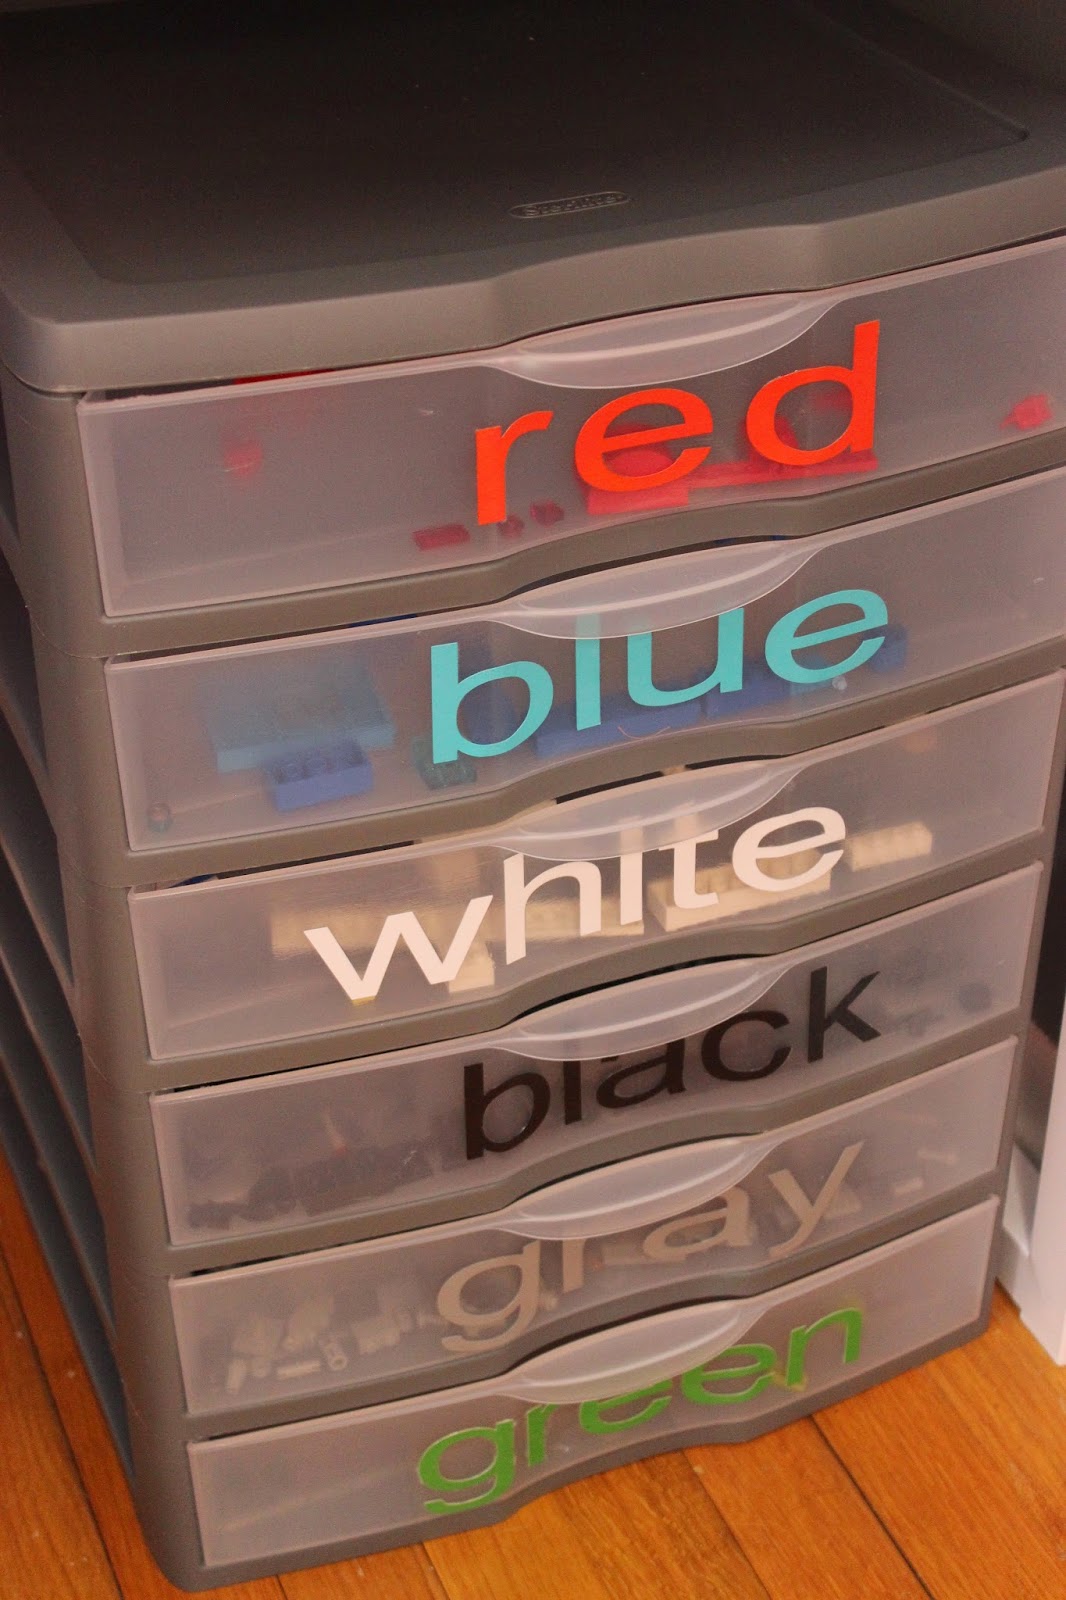
I purchased a set of Steralite drawers from Target as well.  This is where I organized the Legos by color.  At this time, the colors that he has the most of, made it into these drawers.  The other colors are in the desk drawers.  I used my Silhouette Cameo to cut the letters for the drawer labels and I used Mod Podge to affix them.  I found that I will be able to remove them should I ever want to change out which colors we keep in here.  I also have another set of drawers waiting just in case his collection become much larger and we need more storage.  


Like I said, the remainder of the colors are in the desk drawers.  I used a drawer divider to separate them.  In the other desk drawer is another divider with all of the people, animals, hats, heads, capes, etc.  


We have had this setup for over a month now and it's working perfectly.  My son really enjoys having them organized by color and he can usually be found at his desk.  Works in progress are typically all over the desktop and pieces do end up on the floor or in the wrong color bins, but it's a quick fix when  we want to get everything straightened back up.  It turned out fabulous!


My daughter also has a few sets of Legos.  While she isn't as crazy about them as my son is, I still wanted a way to keep them organized.  We decided to go with some small stackable bins and a few plastic shoe containers.  These are also from Target.  Seriously, do I shop anywhere else?!  We organized them and decided to keep the bins in her closet on her shoe rack.  I didn't opt for labels on these, especially because the top bins have a variety of colors in them.  That's not to say I won't label them in the future.  I love labels.  Anyway, it was a quick and easy solution for her Lego collection and we love it!  


Organized Legos = a happy mommy.  A really, really, really happy mommy!  Yay!


Sunday, January 4, 2015

Kitchen Cabinet Tour

Happy 2015!  The first Monday of the new year is right around the corner and that means I am going to immediately start sticking to a budget, lose weight, be healthier, be a better parent, be a better wife, blah blah blah blah.  Honestly, yes, I want to do all of those things, but we'll see how it goes.  I always feel like if I have an organized kitchen, then I will eat healthier.  It has never really worked, but my kitchen needed a bit of an organization overhaul anyway, and that is just what I did this past week!  I am also following along with an organizing challenge on one of my favorite blogs, A Bowl Full of Lemons.  You can read the kitchen post here.

First, here are two photos of my kitchen.  One side is the "kitcheny" part and the other side is the eat-in and "officey" part.  The lighting in this photo is giving the cabinets a yellowy look, but I can assure you that they are white.


Now on with the tour starting with the cabinets and drawers to the right and working counterclockwise.  I keep our glasses, mugs and travel cups right above our Keurig.  


The cabinet underneath the Keurig has all of the extra coffee, tea, etc. pods and packets.  All of the baskets are from Target.  In the back of this cabinet is where I store our party type of dishes and bowls, such as chip and dip plates, large snack bowls, etc.  


The junk drawer.  This organizer is also from Target.


The glamorous towel drawer.


Under the sink.  You can read more about that here.


Plates and bowls.  I keep all of our bigger plastic drinking cups in here since they don't fit in the other drinking glass cabinet.  That red thing on the bottom shelf is an apple slicer.  I keep it in here because our fruit basket is right underneath this cabinet on the counter.


Typical silverware drawer.  Nothing fancy.


Plastic baggies, plastic wrap, wax paper and aluminum foil go in this deep drawer.


Our spice cabinet and drawer.  You can read about them here.


Cookie sheets and cutting boards go in here.  Please don't mind the look of these and our pots and pans.  I swear I have cleaned them as well as I can.


The cabinet above our stove is a little hodgepodge of stuff.  Some baking items, pancake essentials, dessert toppings, seasoning packets, etc.  


This is our plastic container cabinet.  I keep the smaller containers in a larger plastic container on the top shelf.


Pots, pans and strainers are in the cabinet underneath our stove.  I bought the lid organizer from Bed Bath & Beyond.


Our lazy susan houses all of our extra cereal containers, pitchers and thermoses, as well as extra baking ingredients.


This cabinet is for lunchbox essentials, cookbooks and kid cups, plates and bowls.


Another glamorous drawer.  The pot holders and oven mitts.


In this smaller cabinet, I keep our flour and sugar canisters as well as containers of other baking ingredients.


The cabinet above the oven houses all of our Corningware, Pyrex, oils, vinegars and cooking sprays.  My husband's large containers of protein powders and whatnot also made their way in here.  I had some command hooks lying around which I used to hang up our measuring cups.


Underneath the oven is where you can find all of our cake, loaf, cupcake and pie pans, hand mixer, glass measuring cups, mixing bowls and other baking utensils.  In the back, I also have a container with cupcake liners, sprinkles, cookie cutters, icing, etc.  You can read about my baking cabinets here.


The medicine, vitamins and supplements cabinet.  You can read more about that here.  I also hung a Martha Stewart pocket on the cabinet door for keeping prescription refill papers, medication directions, etc.


I hung another Martha Stewart pocket on the side of the fridge.  In this pocket, I keep take out menus and helpful tips for our NutriBullet.  


Utensil drawer.  The divider is from Target.


This cabinet is where I keep all of our choppers, slicers, dicers, etc.  In the back is our old Ninja blender and up near the front you can see our NutriBullet containers.


We don't use the cabinet above the refrigerator very often, just because it's not easily accessible.  All we keep in there are rarely used recipe books and binders.  My husband also keeps his crayons up there with a binder of pictures that him and the kids colored together.  He likes to have his own sharp, clean, unbroken crayons for when they color.  He thinks he is a master colorer.  Haha!


We keep a basket on top of the fridge.  In there you can usually find bags of chips and snacks.  We also have our Christmas candy stash up there right now as well.


To the left of the refrigerator are two tall, deep cabinets.  This is our pantry.  I try to keep it organized, but it's hard to do.  It's hard to know what's in the back because you can't see it and there's really not that much space, so everything is kind of shoved together.  The top shelf has dip mixes, extra condiments and tons of spaghetti sauces.  The second shelf has spaghetti in the very back and then Mexican type stuff towards the front.  The third shelf had canned fish and canned vegetables.


The bottom cabinet is a little bit less annoying simply because we installed some drawers from The Container Store.  The first shelf has condiments, sandwich spreads and soups.  The second shelf has rice, mac and cheese, sides, chicken stock, popcorn, etc.  The third shelf is mostly for the kids.  Lots of fruit snacks, crackers, granola bars, etc.  The bottom shelf is where we keep oatmeal and cereals.  


And that's every single cabinet on the "kitcheny" side of our kitchen.  I will share our "office" cabinets in another post.  Now that my kitchen is cleaned up to my liking, maybe I can get this year off to a good start as far as healthy eating goes.  Wish me luck!  :)


Sunday, December 14, 2014

Gift Wrapping Station

I suppose I am a bit late with this post considering that Christmas is 11 days away, but I am finally ready to start wrapping as far as being almost done with shopping is concerned.  I decided that I would share my wrapping station with you in case you need some inspiration.  I have done a post on my scrapbooking/wrapping area before, but today I will just give a quick refresher on how my wrapping essentials are organized.  This is my little corner in the basement.  Unfortunately, it's hard to get a good picture without my husband's weights making an appearance, but you get the idea.  


I do the majority of my scrapbooking at the desk on the right and I do wrapping on the desk to the left and all over the floor, of course!  Most of my wrapping supplies are in the cubbies on the left side of my IKEA Expedit, so it makes sense.  I store a lot of stuff in magazine files such as tissue paper, sheets of wrapping paper, cellophane bags and sheets of gift tags.  Most of my gift boxes fit neatly here as well.


I keep my greeting cards in plastic container divided by occasion.


On my desktop, I have the necessary scissors, pens, markers, tape, etc.  


I keep almost all of my Christmas gift bags in an organizer on a door.  I keep wrapping paper rolls in a large container that I picked up at Target.  Obviously, I am still lacking in the Christmas wrapping paper area.  I absolutely LOVE this container because it is tall enough to accommodate those really long rolls of wrapping paper.  I also love that it has a flip-up lid for easy access.   I have a smaller, similar container for my non-Christmas wrapping paper.


In the armoire to the left of my desk, I keep all of my non-Christmas gift bags.  I also store some gifts in here throughout the year.  Whenever I buy something that I plan to give for a future birthday, I store it in here.


I also have a rolling gift wrap cart which is great for smaller rolls of wrapping paper, gift tags, ribbon, bows, tissue paper and gift bags.  I love that I can roll it over to wherever I am wrapping whether it be at my desk or somewhere else in the room where I need floor space to wrap something.  My cart is from the Recollections collection at Michael's.  


Other than needing to run to the store to stock up on actual wrapping paper, my wrapping station is ready to go!  Where do you do your holiday gift wrapping?  Are you ready or do you still have to do the shopping part yet? 


You might also like: