Monday, January 27, 2014

Organized Coat Closet


I don't know about your neck of the woods, but where I am from, we are definitely in the dead of winter.  I am talking snow and freezing temperatures.  There isn't a better time than now to show you how I organize our coat closet.  It's the first door in our hallway right off of the front door.  We have lived in this house for over 2 years now and still haven't gotten around to painting inside this closet or changing out the shelving.  I really would like to do both at some point.  Regardless, this closet does it's job.


The best thing I ever put in our coat closet was an over-the-door 24-pocket shoe organizer.  It's where we keep our most often used gloves and hats.  Prior to buying this, our outerwear was, well, out of control.  


All of our scarves and most of my husband's winter hats are in bins on the top shelf of the closet.  I labeled the bins with Martha Stewart chalkboard labels.  On the floor, there are two shoe organizers.  We don't keep any shoes in here, so I usually just store excess toilet paper there.  I keep our two diaper bags in here as well.  


It's very rare that this closet gets messy.  I love those spaces that stay organized no matter what.  There are very few of them in our house, but this is definitely one of them!  I never have to worry about things falling out when I open the door and we haven't had a hard time finding gloves and hats since I bought that shoe organizer.  Love love love!  Stay warm, my friends!


Linking up to these amazing blogs!

Sunday, January 26, 2014

Organized Spices

The other day, I showed you our organized baking cabinets and told you how I was following along with an organization challenge over at A Bowl Full of Lemons.  The latest project was the spice cabinet.  You can read her post here.  I used most of her ideas and love the results!  My husband is the cook in our family and when he saw me taking all of the spices out of the cabinet, he said "you know you don't need to organize what you don't use."  Well, I did it anyway, and he approves!  We had been keeping all of our spices in the cabinet to the right of our stove.  After seeing Toni's (the blogger over at A Bowl Full of Lemons) cute spice jars in a drawer, I decided to utilize the drawer to the right of our stove for spices as well.


I picked up 12 of the same spice jars that Toni uses and a few other jars from Bed Bath & Beyond.  I took 15 of the spices we had in the cabinet and put them in these jars.  I labeled them with Martha Stewart labels and my label maker.  They turned out great!


To organize the cabinet, I purchased two tiered shelf organizers from Beth Bath & Beyond.  I asked my husband which things he uses the most and put them closest to the front on each shelf.  And without the 15+ containers that I moved into the jars, there was a lot more space in the cabinet.  He even let me *gasp* throw away some stuff.  


I am so happy with the result of this little makeover.  Maybe one day I will go into this cabinet and drawer for a reason other than to organize them!  Maybe!  :)


Linking up to these amazing blogs!

Friday, January 24, 2014

Quick Fix Friday - Warranties & Manuals


Today  I am showing you how I organize my warranties and manuals.  This QFF is something that could be done in a short amount of time, given that your warranties and manuals are already in one spot (in which case, maybe they are already organized enough for you! :)  If you have them all scattered about, it may take you longer.  The solution I have for keeping this paperwork organized came straight from one of my favorite YouTube channels, Home Organizing by Alejandra.tv.  This specific video can be found here.

The items you will need for this project are a 3-ring binder (mine is a 3" binder), plastic binder envelopes (like these from Staples - I purchased them individually at my local store), and some tab dividers (like these).  I also used my label maker.  Or you could use an accordion file, a filing cabinet, or punch holes right in the manuals/warranties/product instructions and just slip them in a binder like that.  Obviously, this won't be the solution for those items that come with phone book sized manuals.  There are many ways to get them organized and in a spot where they can easily be found if needed.  This system is basic and easy to put together.


My categories are TV & DVD, Computer, Gadget, Household, Kitchen, Beauty, Toys & Baby.


This binder lives on a shelf in our laundry room.  I do not need to access it often at all, but it definitely is convenient for when I do have a question about a product or when I go to sell something.  I find you can usually get a few bucks more if you can include the manual.  


Hooray for organized warranties and manuals!  Thanks to Alejandra for the awesome idea!  I find so many organizing solutions on her YouTube channel!


Linking up to these amazing blogs!

Tuesday, January 21, 2014

Organized Baking Cabinets & Utensils

One of my favorite blogs, A Bowl Full of Lemons, is currently doing a kitchen organization challenge. The last two posts were all about how to organize baking essentials and utensils.  You can read the posts here and here.  Of course, I have been trying to follow along with the challenge.  This weekend, I did a little baking cabinet and utensil organization myself.  My "baking" cabinets are underneath our oven.  Under our lovely, brown 1960's oven.  So beautiful.


In the cabinet directly under the oven, we have baking pans (cake, lasagna, cupcake, loaf, pie, springform, etc.), the hand mixer, measuring cups and spoons, mixing bowls and cake decorating items.


The cabinet to the right of this one is where we have many of our baking ingredients.  I keep them in a matching set of black canisters and some OXO containers.  I labeled them with Martha Stewart labels.  In here there is flour, sugar, powdered sugar, corn starch, cocoa powder, baking soda, baking powder, light and dark brown sugar, chocolate (kisses, chips, baking chocolate) and a rolling pin.  


The drawer to the left of our oven houses some of our utensils.  The expandable drawer divider is by OXO.


On the counter to the right of our oven is where we keep the most often used utensils and knives.  My utensil crock is from Home Goods.  I am not fond of the magnetic knife holder, but my husband is the cook and he won't let me get rid of it.  We keep pot holders in the small drawer to the right of the oven.


And that sums up my organized baking area of the kitchen.  I am excited to see the next challenge on A Bowl Full of Lemons.  I will be sure to share my space with you as well!


Linking up to these amazing blogs!

Tuesday, January 14, 2014

My Labeling Essentials


Today I am taking a little departure from showing you an organized space or room.  Instead, I wanted to tell you about the labeling items that are essential to my organization and how I store them.  A few months ago, I became frustrated with not being able to find labels that I had printed out.  I needed a solution for all of my labeling essentials ASAP.  I picked up a plastic caddy from Walmart and naturally labeled it my "Labeling Caddy."


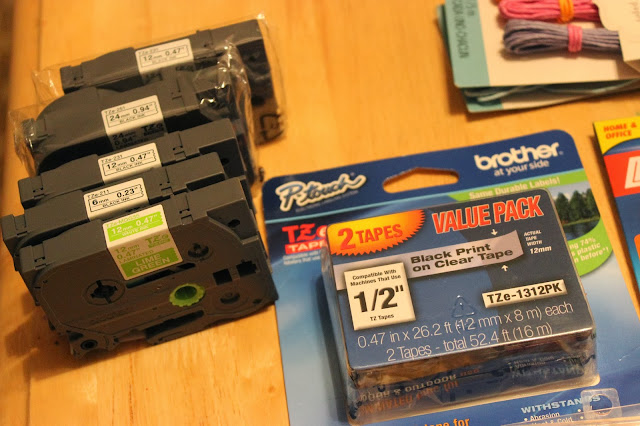
I gathered all of my labeling goodies including, but not limited to, tons of Martha Stewart labels (my favorite!), Brother P-Touch tape refills, double sided tape, velcro, mounting tape, string, tags, chalkboard cards, chalk markers, mini clothespins and fun-tak.  


Everything fit perfectly into the caddy and the caddy fits perfectly in the cabinet under my "desk" in our kitchen.  I plan to write a post about my kitchen desk area, but I will wait until I have it organized more to my liking.  


Also essential to my labeling, are my two Brother P-Touch label machines.  I am in love with these gadgets!  I bought them both at Staples during label maker sales.  In the cabinet they sit next to two small bins with a few other labeling/office supplies.  


I often use my laminator for labeling as well.  It also has a spot in this cabinet.  I keep all of my laminating sheets in a magazine file along with CD/DVD labels, larger Avery labels, return address  labels and labels that I have previously printed from the Internet.  


For Christmas, my wonderful mother bought me a Silhouette Cameo!  Awesome, but what exactly is that, you ask.  It is an electronic cutting machine.  It can do so much in the way of arts and crafts, paper crafting, custom apparel, vinyl decor, scrapbook layouts and what else, customized labels!  Yay!  It will be a long while before I use this baby to its full potential, but the first thing I plan to do is whip up some vinyl labels for bins, etc.  I am beyond excited!  


That about sums up my labeling essentials!  I couldn't be completely organized without them!  


Linking up to these amazing blogs!

You might also like: